
Tech Tips - Setting your sag
What Is Sag Anyway?
Before you do anything else. Set your Sag. What on earth?
What is sag? Basically, it’s how much your bike sits into its suspension when you get on your bike and take your feet off the ground.
Why do I need to set it? Suspension is designed to work best between a given range of sag. The amount of sag varies on different bikes, depending on manufacturer and riding type, but getting into the desired range will give you the ride height the bike was designed to run at.
So how do you do it?
There are a number of thoughts on how to do it, some very simplistic, but what we lay out below is the way we do it.
The best way is to have someone help you if you can, it’s not vital, but it may be safer.
Step 1 – Get the basics set
Wind off all your compression damping (if you have it) to minimum. This just ensures your damping doesn’t interfere with the setting of your sag.
Step 2 – Set your O-ring
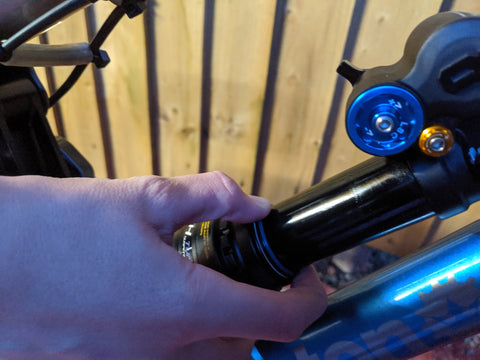
Slide your suspension’s rubber O-ring travel marker down to the seal.
Step 3 – Load the bike
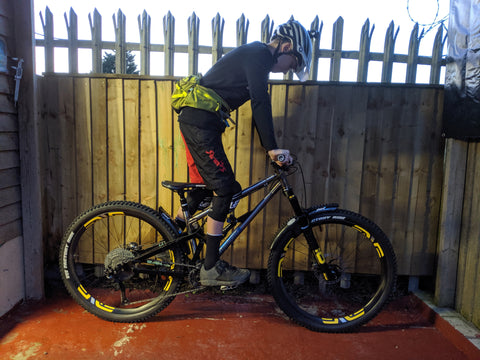
Time to get on the bike.
FORKS
If you have someone helping, have them hold the bars whilst you stand on the pedals in your normal riding position. If not, then you’ll need to lean against something, such as a wall.
Slide your sag indicator down to the wiper seal and then let the fork settle with your weight, but don't push past that point. Slowly get off the bike and measure (see step 4). With that measurement recorded, get back on the bike, but this time push past the sag point and then let the fork push your weight back up to the sag point. Get your assistant to slide the sag indicator down to the wiper seal while your weight is still applied. Slowly get off the bike and measure (see step 4). Add both measurements together, then divide by 2 to give you an average. This is your sag. The difference between the 2 measurements is the friction within the fork.
REAR SHOCKS
With rear shocks, we prefer to measure sag in the seated position (with the exception of DH bikes, standing for these) as it gives a more consistent reading, being a fixed position. Same process as above, just seated with the saddle at full riding height.
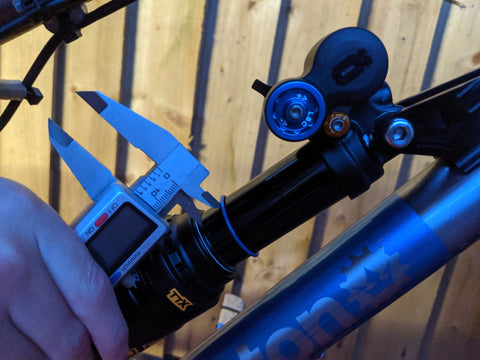
Step 4 – Measure
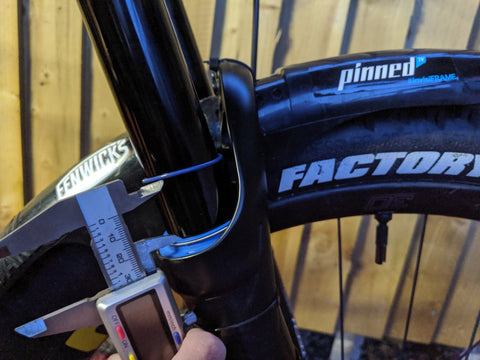
Once off your bike, use a tape measure to measure how far your O-ring has moved from the seal. In general, you’re looking for sag in the range of:
XC bikes – Fork 15-20%, shock 20-25% (100mm fork, 15-20mm. 38mm stroke shock 7.6-9.5mm)
Trail/Enduro Bikes – Fork 20-25%, shock 30-35% (150mm fork, 30-37.5mm. 60mm stroke shock 18-21mm)
DH Bikes – Fork 20-25%, shock 30-35% (200mm fork, 44-54mm. 75mm stroke shock 24.8-28.5mm)
If you want a soft feel, run more sag, if you want a firmer feel, run less sag.
But please refer to your manufacturer’s recommendations first.
Step 5 – Pump Time
Use your shock pump to inflate or deflate the suspension until you are getting the desired amount of sag. Don’t forget to balance the air chambers each time you change the pressure, otherwise you’ll get a false reading. Do this by slowly cycling the fork or shock through the first 20% of stroke and you’ll her a little hiss as it balances. Recheck the pressure and remeasure your sag.
Step 6 – Reset your Rebound and Damper settings
Time to reset your settings and get out and ride.
Step 7 - Go Ride
Most importantly, see how it feels to ride. MTB trails are never perfectly flat and you’re never in the same position for long, so get a feel for how the bike is riding and experiment with slightly more or less sag. If the fork is sitting too far into the travel on the descents, try increasing the pressure to raise the ride height, or if the rear is sitting too deep on the climbs, do the same. If either are riding too high and causing the bike to lose grip and feel harsh, then try running more sag.
Keep an eye on the amount of travel you’re using whilst riding too. If you find you’ve got your ride height about right with sag but you’re using too much travel for example on big hits or landings, then you need to add a volume spacer. You could increase pressure, but this will just reduce your sag and have a negative effect on everything but the big hits and landings. The opposite applies if you’re not using enough travel, just try removing a volume spacer.
Keep tweaking it until you’re happy.
Thanks to Jim & Tod from Pinned.TV for the pics
__________
For a visual run through, checkout the video Pinned.tv shot when they popped in for us to set the sag on Tod's new Stanton.
___________
To discuss any technical settings with us, please don't hesitate to email us at service@j-techsuspension.co.uk